
How to Do a Reverse Grip Push Up

The reverse grip push-up is a bodyweight exercise that gives your biceps an extra challenge. As well as the biceps of the upper arms, this exercise targets the triceps of the arms, the deltoids in the shoulder, and pectorals in the chest. You will also activate the erector spinae of the back, and even the rectus abdominis and transversus abdominis in the core.
The motion performed during any kind of push-up helps to assist in everyday exercises such as pushing heavy loads. It will also work to strengthen the shoulders and improve the health of your upper body.
How To
- To perform the reverse grip push-up, you will start in the position of a standard push-up: feet extended out fully until you are on your toes and hands placed about shoulder width apart and directly under your shoulders. Make sure that your back is not dipping toward the floor or arching up.
- Now rotate your hands outward until your fingers are facing back toward your feet.
- Engage your core and inhale as you slowly lower yourself toward the floor. Keep your elbows tucked into your sides during the entire movement. Your shoulders should be at no more than 90 degrees at the lowest point of the movement.
- Exhale and push through the chest as you slowly push back up to nearly straight arms. Make sure not to lock the elbows at the top of the movement.
Repetitions
The exercise can be repeated as many times as you are able. If you are a complete beginner, you may only be able to complete one or two repetitions from your toes. Try not to be discouraged by this. You can drop down to your knees in order to complete more repetitions.
Variations
Using a barbell: Instead of having the hands flat on the floor, using a barbell dictates that you use an underhand grip. This forces your elbows to stay tucked into your sides and makes it virtually impossible for them to flare out while performing the push-up. This will help you to avoid injuries in the shoulder. Be mindful of your positioning over the barbell so that it doesn’t end up rolling forward during the exercise.
Incline: Performing this move using a bench will help to take weight and pressure off your wrists, making the movement easier. To get into position, place your hand on the edge of a padded bench in an underhand grip with palms facing away from your body. Extend the legs out until your body forms a straight line. As with using a barbell, you get the added bonus of using the underhand grip.
From the Knees: If you are unable to complete a push-up from your toes, start on your knees. This will help to build the strength necessary to move up onto your toes.
Cautionary Notes
Be very careful to keep that straight line in your back. Any sagging or arching can really strain the muscles in the lower back. Keeping your core and glutes engaged will go a long way to maintaining proper form.
Make sure to keep those elbows tucked into your sides during the entire movement. Allowing the elbows to flare out can cause impingement injuries in the shoulder. If you are struggling with this, try using a barbell or bench.
The reverse grip can be a difficult hand position for anyone with wrist mobility issues or previous injuries. If you feel any pain during the exercise, try using a barbell or bench. If that doesn’t fix the problem, cease the exercise.
More Reverse Grip Push Up Related Resources
14 Types of Push-Ups-and How They Help You | Outside Online
Incline Push-Up Reverse Grip | Exercise Videos & Guides | Bodybuilding.com
Try Reverse Push-Ups to Build a Strong Chest and Shoulders | STACK
How to do the reverse grip press-up
Reverse Grip Barbell Push ups / Press Ups ? WorkoutLabs Exercise Guide
Reverse Grip Incline Push Up: Video Exercise Guide & Tips
Analysis of the Reverse Grip Push-Up – Home – Champions Club
What Is a Reverse Push-Up? | Livestrong.com
Pushups for Biceps: 3 Moves to Strengthen Your Arms, Chest, More
Related Videos

How to Train Your Biceps with Push Ups

Reverse grip push ups; triceps vs shoulders

10-Minute Pushup Workout for Big and Muscular Arms
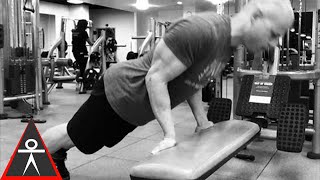
Build Your Chest With Underhand Push Ups
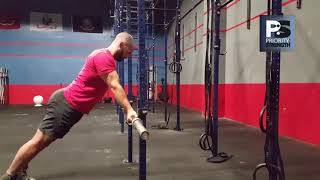
Reverse Grip Barbell Pushup - Why the Underhand Grip?
-
How to Train Your Biceps with Push Ups
-
Reverse grip push ups; triceps vs shoulders
-
10-Minute Pushup Workout for Big and Muscular Arms
-
Build Your Chest With Underhand Push Ups
-
Reverse Grip Barbell Pushup - Why the Underhand Grip?
What the reverse grip push-up actually is
The reverse grip push-up is a push-up variation where you rotate your hands so your fingers point toward your feet instead of forward. That single change shifts the stress away from your chest and toward your biceps, forearms, and the front of your shoulders. Most push-up variations load the triceps heavily. This one does the opposite, making it useful when you want upper-body pulling muscles to work during a pressing motion.
You start in a standard push-up position. Your hands are flat on the floor, about shoulder-width apart, with fingers pointing back toward your toes. Your body stays in a straight line from head to heel. You lower your chest toward the floor, then press back up. The range of motion is shorter than a standard push-up because the wrist position limits how far you can descend comfortably.
Muscles worked during this movement
Primary muscles
The biceps brachii are the main target. When your fingers point backward, your elbow flexors have to engage to stabilize the joint as you lower and press. This is unusual for a push-up, which normally keeps the biceps in a passive role.
The brachialis sits under the biceps and also works here. It is a pure elbow flexor, and it responds well to the wrist position this exercise demands.
Secondary muscles
Your anterior deltoids (the front of your shoulders) work to move your arms forward and upward during the press. Your pectorals still contribute, but less than in a standard push-up. Your core muscles, including your transverse abdominis, keep your hips from sagging throughout the set. Your wrist flexors work hard to hold the unusual hand position, especially during your first few sessions.
How to do the reverse grip push-up with correct form
Step-by-step setup
Place your hands on the floor with your palms flat and your fingers pointing toward your feet. Keep your hands roughly below your shoulders or slightly narrower. Extend your legs behind you so your body is straight. Brace your core and squeeze your glutes before you move.
The movement
Inhale as you lower your chest toward the floor. Keep your elbows close to your sides rather than flaring them out. Lower until your chest is a few inches from the floor or until your wrists tell you to stop. Press the floor away and exhale as you rise back to the start position. Pause briefly at the top before your next rep.
How many reps to aim for
If you are new to this exercise, start with sets of five to eight reps. The wrist stress is real, and going to failure early can cause joint discomfort. Work up gradually. Most people can handle three sets of ten to fifteen reps after a few weeks of practice.
Common mistakes and how to fix them
Flaring the elbows
When elbows flare wide, the biceps lose most of their involvement and the exercise becomes harder on the shoulder joint. Keep your elbows tracking close to your torso. Think about pointing your elbows toward your feet, not out to the sides.
Letting the hips sag
A sagging lower back puts stress on your spine and reduces core engagement. Squeeze your glutes and brace your abs before every rep. If your hips drop midway through a set, stop and rest rather than grinding out bad reps.
Rushing through wrist discomfort
Wrist discomfort in the first few sessions is common. It usually means the wrist flexors and extensors are not yet conditioned for this position. Do not push through sharp pain. Instead, do a shorter range of motion or drop to your knees until the wrists adapt. Most people see a big improvement in wrist comfort within two to three weeks.
Placing hands too wide
Wide hand placement increases shoulder strain and reduces biceps involvement. Keep your hands at or inside shoulder width to get the most from the exercise.
Progressions and regressions
Making it easier
Drop to your knees. Keep the reverse grip and the same body alignment, but take some load off your wrists and upper body. This is a good starting point if you cannot do even five full reps with good form.
You can also do reverse grip push-ups against a wall or an incline surface like a bench. The higher the surface, the less bodyweight you lift, making the exercise easier on both your muscles and your wrists.
Making it harder
Elevate your feet on a bench or step. This shifts more weight forward onto your hands and increases the demand on your biceps and shoulders. Keep the same tight body position and close elbow path.
You can also add a slow eccentric, which means a slow lowering phase. Take three to five seconds to lower down, then press back up at normal speed. The slow lower increases time under tension, which builds more muscle without adding external weight.
Weighted vests add load if bodyweight work becomes too easy. Even ten pounds changes this from a moderate exercise to a serious biceps and shoulder challenge.
How to fit this exercise into a training program
Where it fits in a session
Use the reverse grip push-up as an accessory movement after your main pressing exercises, such as bench press or standard push-ups. It works well at the end of an upper-body day or as part of a bodyweight circuit. Doing it early in a session, before your wrists are warmed up, increases the chance of discomfort.
Pairing it with other exercises
It pairs well with dips, which also work the anterior shoulder and chest. Together, they cover the pushing muscles thoroughly without any equipment beyond a bench. You can also pair it with inverted rows or chin-ups on the same day to balance push and pull work for the biceps.
Frequency
Two to three times a week is enough for most people. The biceps and wrist flexors need recovery time, especially when you are new to this position. Give at least 48 hours between sessions that include this exercise.
Who benefits most from this exercise
People who train without access to gym equipment get a lot of value from this move. It is one of the few bodyweight exercises that puts meaningful stress on the biceps. Gym-goers who want to add biceps volume without adding more barbell or dumbbell curls can use it as a finishing exercise.
Older adults building grip and wrist strength find this useful, provided they start with a regression and build up slowly. Physical therapy clients recovering from certain shoulder conditions sometimes use it too, though you should check with a licensed clinician before adding it to a rehabilitation program.
Personal trainers use this exercise with clients who need variety, who train at home, or who have grown bored with standard push-up variations. Knowing how to coach less common movements is part of what separates an effective trainer from one who relies on the same five exercises.
Safety and wrist care
Warming up the wrists
Spend 60 to 90 seconds on wrist circles and wrist flexor stretches before you attempt reverse grip push-ups. Rotate your wrists slowly in both directions. Then press your palms flat on the floor in the reverse position without any body weight on them, just to feel the stretch. This preparation reduces discomfort and lowers injury risk.
When to stop
Stop if you feel sharp pain in the wrist joint, not muscle burn, but joint pain. Soreness in the forearm muscles after your first few sessions is normal. Pain in the wrist bones or a clicking sensation that comes with pain is not. Rest for several days and reduce the range of motion when you return.
Surface matters
A yoga mat or exercise mat makes the exercise more comfortable than bare floor. The padding reduces pressure on the palms. If you train on hardwood or concrete, a mat is worth using every time.
How personal trainers use this in client programming
A well-trained personal trainer can look at the reverse grip push-up and immediately identify its purpose: biceps loading through a closed-chain, bodyweight pattern. They can regress it for a beginner, progress it for an advanced client, and explain the mechanics clearly to someone who has never heard of it.
That kind of exercise knowledge comes from formal training. Certifications from organizations like the National Academy of Sports Medicine (NASM), the American Council on Exercise (ACE), and the National Strength and Conditioning Association (NSCA) cover exercise science, anatomy, and program design in depth. They teach you to think about why an exercise works, not just how to perform it.
If you want to turn this kind of knowledge into a career, exploring a personal trainer certification program is the practical next step. Programs vary in cost, length, and focus. Some prepare you for a specific exam; others include practical hours with real clients. Comparing programs by their curriculum, exam pass support, and career resources helps you find the right fit for where you are now and where you want to go.
Start by looking at accredited certification programs in your area or online. The right program gives you both the science and the practical tools to coach exercises like this one with confidence.